Friday, August 16, 2019

Quick Water

While camping in the wilderness, I've noticed that it's helpful to have a little bit of water for rinsing hands, washing glasses, brushing teeth, and so on. Sometimes I would use a bottle of water, and sometimes I would deploy the fully-loaded 5-gallon jug, but I needed something quicker and easier.

After testing several configurations, I've landed on the quickly deployed setup pictured below. It's a 48 ounce Nalgene with one Brita spigot installed near the bottom and one installed in the top cap (for ventilation). I'm using a "bottle belt" (available several places online) and a carabiner.

I store the bottle clipped to the back of the driver's headrest post, and I deploy it by clipping it on the back door latch receiver. I open the top vent and then use the bottom spigot either momentarily or locked on. Quick and easy for a bit of water!


Monday, October 29, 2018

Sleeping Platform Upgrade (v3.0)

It's been a few years since I first started camping in a car, and over the years I've made a few upgrades to the sleeping platform for our Subaru Outback. The first attempt was a door from our local Habitat for Humanity Restore. This original carpet-covered monstrosity accomplished the mission of creating a level place to sleep. The downside was that no one could travel in the front passenger seat, since it forced the seat to be all the way forward.


A few years ago, I needed to drop my wife off to visit her sister in Fort Collins, Colorado, on my way to see my sister in Port Angeles, Washington. This was a huge 5,000 mile round trip from Wisconsin, so I needed a sleeping platform that would allow the front passenger seat to at least come back to a normal position. The result was Sleeping Platform v2.0! Instead of a door, I used some plywood and a piano hinge from Habitat Restore and created a platform where the last 12 inches could flip up (at the feet, right inside the hatchback). To accommodate a passenger, I would flip the rear section up and pull the whole platform 12 inches to the rear. This allowed the front seat to come back to a normal seating position.


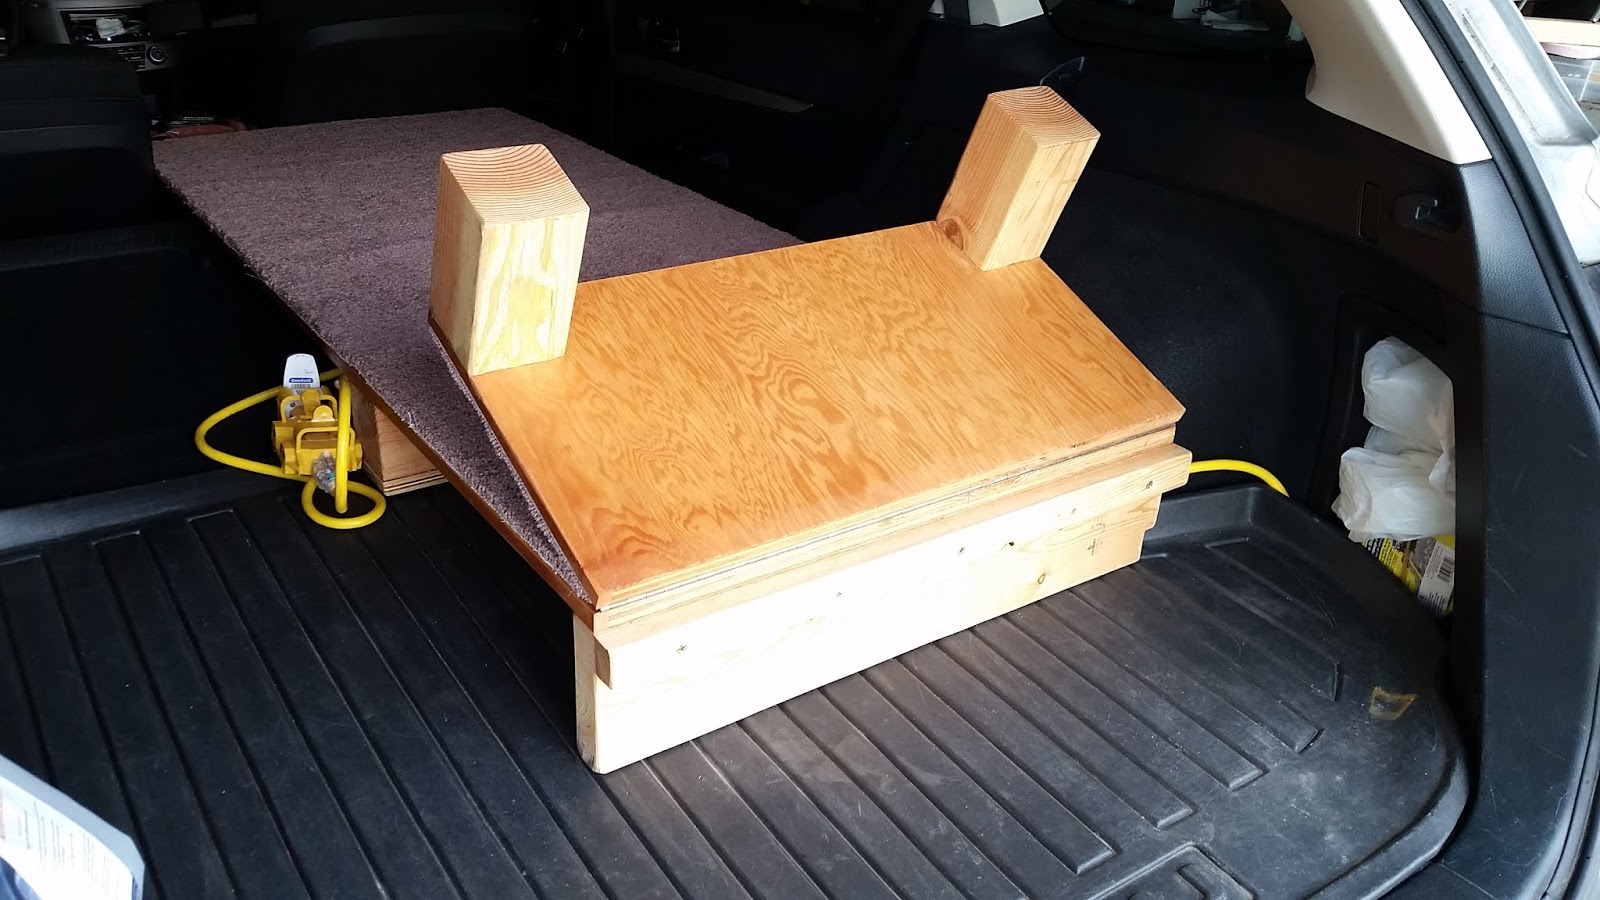
That trip exposed a weakness: Although the front seat could come back to a normal seating position, it couldn't really recline - apparently a problem when you take your wife on a cross-country trip. So, for the sake of staying married, further improvements were needed. A few months of brainstorming led to v3.0, a design that now allows not only full reclining of the front passenger seat, but also allows us to use all five seats in our Outback if needed. The latest version is also made primarily out of reclaimed materials, but it consists of two parts: 1.) a base that fits in the rear of vehicle, and 2.) the front extension that connects to the rear with two bolts that rest in holes. This front extension can either be raised up and slid slightly to the rear (just enough to move and recline the front passenger seat), or it can be taken off completely and rotated, storing it in the rear (allowing us to use all five seats in the car).


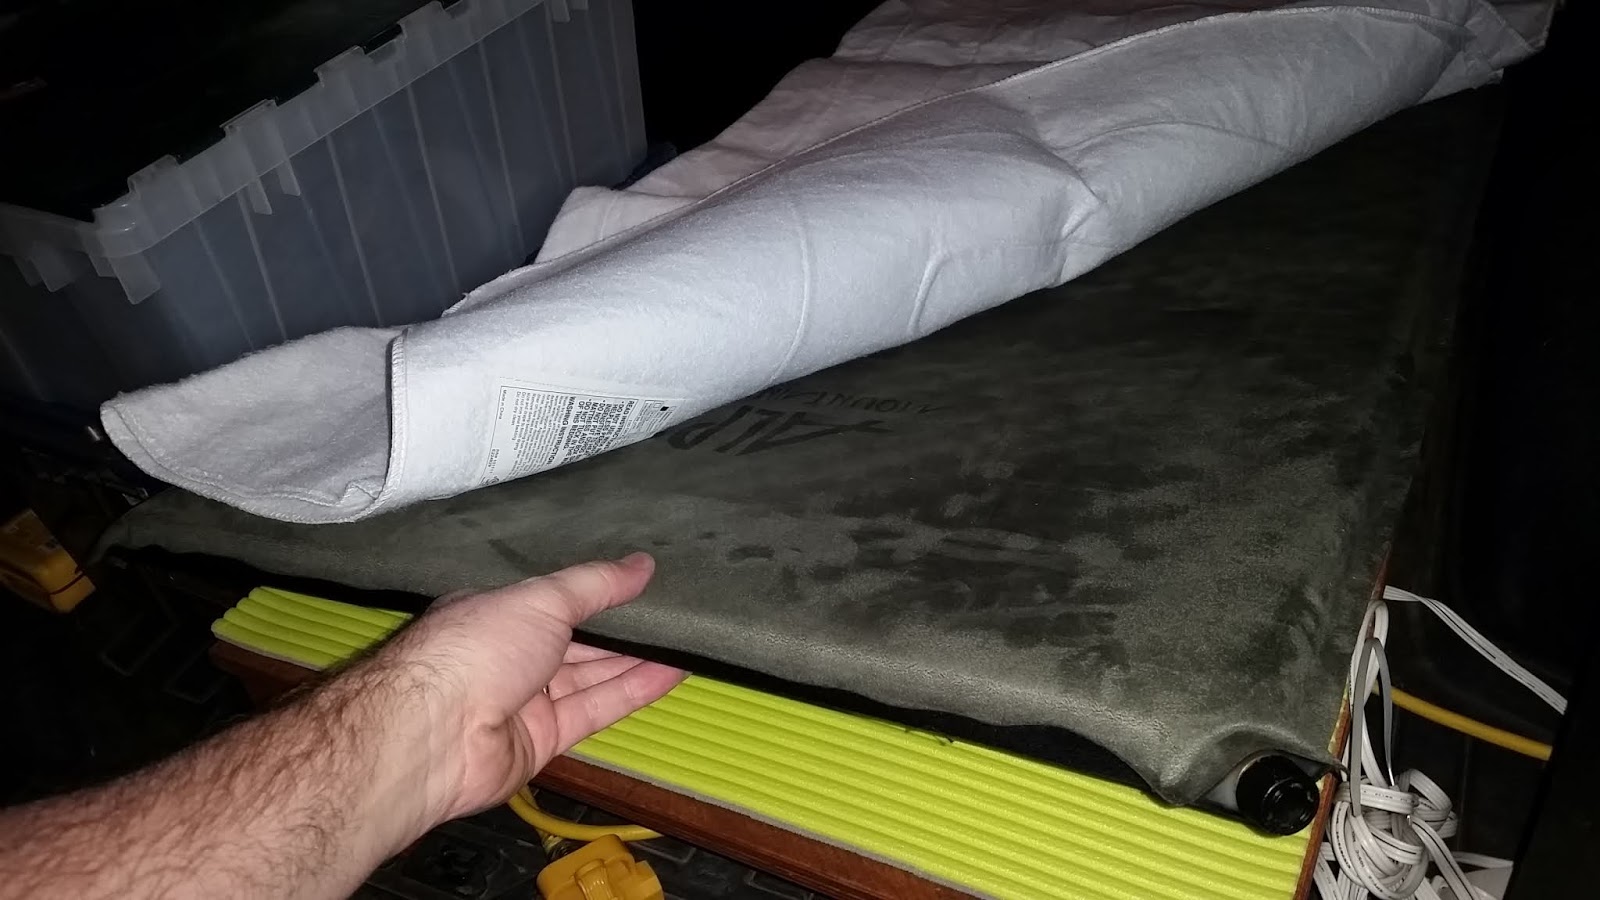
Instead of carpet this time, I decided on a foam yoga mat from Aldi for about $10. It was nearly the perfect size and is even more comfortable than the carpet. It also gives a bit of grip, preventing my sleeping pad and bag from sliding around. Combined with a full-sized mattress pad warmer (doubled over and trimmed down to just the heating element, the "fitted" part completely cut off), this setup has been just about perfect for winter camping with "shore power" (discussed in a previous post). My teenage daughter travels with me to a series of lectures at my old university every February, and this has made the trip quite comfortable. She sleeps in a dorm on campus, and I sleep at a nearby state park.


The rear section is 26" wide by 36" long (including the lip that accepts the pegs/bolts), and the front section is 42" long. With the overlap, the entire length when deployed is around 76" inches, just perfect for this particular 73.25" car-camper!

As you can see from a few of the pics above, I've also transitioned to using a flip-top storage tote that fits perfectly in the leftover space toward the rear of the car. I've found two of these half-height totes at Goodwill over the past year (9.5"H x 21.5"L x 15"W) , and this allows me to stack them two-high (one for clothing and one for gear).

To store the bed platform, I made a bracket that allows it to hang on the garage ceiling.

Monday, September 17, 2018

Stolen Campsites

One of the challenges of camping in a car has been dealing with stolen campsites. Since I'm camping in a vehicle and the vehicle leaves during the day, some people come in looking for a site and think that mine's free (since there's nothing left behind). Some of these have been honest mistakes, but other situations have been quite intentional and brazen. The problem is even worse in campgrounds that aren't managed too well.

Thankfully, I've learned a bit over the years concerning how to prevent campsite theft, and I'm hoping that some of this might be helpful to those of you who find yourselves in similar situations. Years ago, when I first camped at Douglas Dam Headwater Campground (a TVA campground near the Smoky Mountains in east Tennessee), all campsites were only available on a first-come, first-serve basis. You fill out an envelope, put the payment in a steel tube, and put a slip in a clip on your site. The fine print explains that you need to leave some kind of a "dwelling unit" at your site during the day to show that it's occupied (a tent or an RV of some kind). Since I was camping in the car and needed to be away from the site all day, I brought what I referred to as a "sacrificial tent," a small tent I bought in high school many years ago. It took some wasted time and effort to set up a tent I wouldn't actually sleeping in, but it helped to show that the site was occupied. This worked the first year, but the second year at the same campground, I came back one night to find my tent literally ripped up in a pile by the side of the road and a drunken party going on at my site. The whole campground was completely full, so I couldn't just move, so I approached the group and said, "Hey, I think you're in my site." It didn't go too well, and the sheriff ended up getting involved. They claimed that there was no slip in the clip and that my tent was by the side of the road when they got there, but the deputy didn't believe a word of it and kicked them out.

The Sacrificial Tent (before)
The Sacrificial Tent (after)
Thankfully, this campground now has a reservation system and is well-managed by a private contractor, and I haven't had any trouble since then.

But, similar things have happened elsewhere. Earlier this year I was camping at Heart o' the Hills in Olympic National Park, and I was the only camper in the entire campground (I was there in that narrow window between avalanche season and tourist season, in late April/early May). I got back one night to find a French-speaking couple from Quebec in my site. They had the whole campground to choose from, but chose my site, even though I had left a clothesline with a sheet on it as a marker, and even though I had self-registered, properly leaving my slip in the display board. They hadn't paid at all and were just trying to abuse the system and camp for free. I could have had them evicted, I suppose, but they had just used their last firewood and were in the middle of cooking. They promised to leave the next morning, so I had them pay for a new site for me for that night, and I would move back to that site the next day. No problem. But, the next day (still just me in the whole campground), a ranger must have come by during the day. Thinking my site was abandoned, the ranger mistakenly took down my clothesline and sheet, and cleared out the reservation board. Before I got back, a young family came in and got my site. This was on a Saturday night, and the campground had suddenly filled up since it was the weekend. I got back and had nowhere to stay for the night. I had a receipt showing that my site was paid for, but this family was already settled in for the night, so I didn't press it and ended up sleeping in a parking lot at a nearby trailhead (illegal, but it was my only option, and I would be leaving before sunrise the next morning). There must be a better way.

Reservation Board at Heart o' the Hills in Olympic National Park
I put a note in my window while sleeping at the trailhead
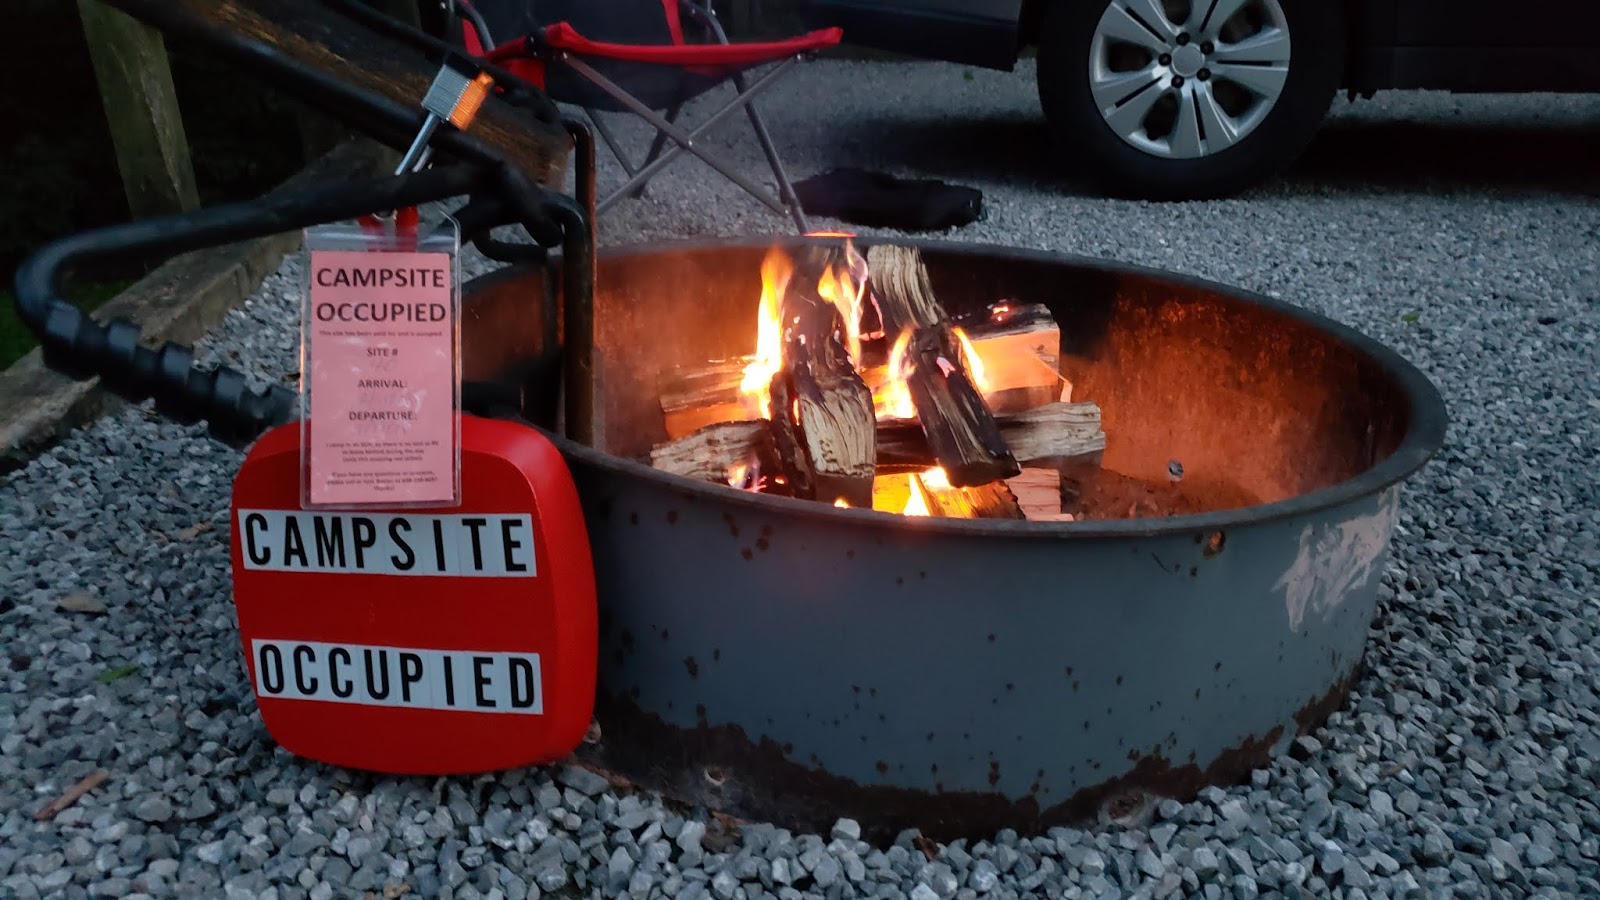
To try to keep this from happening again, I needed some way to mark my site as being occupied, something that's portable, secure, informative, and obvious. So, later on that trip, I found a square cast iron skillet at a thrift store, and when I got home I sanded it, gave it a coat of bright red paint, and spelled out "CAMPSITE OCCUPIED" in reflective lettering.


My goal was to lock this on something at the campsite along with some contact info. For the contact info, I needed a waterproof pouch that could be attached to the lock, so I found a pack of cruise ship luggage tags on Amazon that worked perfectly.


For the info part of this, I typed up a fill-in-the-blank type note with the relevant info (and made several copies to carry along on future trips or to change from site to site).


I then used a cable and lock from home, and found a perfectly-sized case at a local thrift store.


Everything fits in the case, and it takes up almost no room at all in the car. It's also quick and easy to deploy. I know it's not foolproof, but I used it on a recent trip, and I think it serves to inform honest people (fellow campers as well as rangers). It is also incredibly visible from the road - if somebody is driving by looking for a site, it's now obvious: This one's taken. On this last trip, I locked it directly on the fire ring. I might use the cable if there's no fire ring and I need to lock it to a tree or a picnic table.

I want low-drama camping as much as possible, and this seems to be helping.


Something else that's helped: Whenever I check in, I always take a quick pic of the site and my tag. With the Heart o' the Hills incident, it helped get a refund from the park, and it helped with the training of rangers, since they are the ones who wrongly cleared the reservation board, thinking my site was abandoned. Without the pic, there is no way they would have believed me.

Monday, August 21, 2017

Yankee Ingenuity vs. Southern Heat and Humidity

I don’t deal well with heat, and I've never dealt well with heat. I would get sick on car trips as a kid, and I found that it helped to be cool. But, the back seat was too far from the A/C, so I used tape and some plastic trash bags to create a hose that would blow cold air right into my face. My parents actually took a picture of an early version (below).
One Happy (and cool) Kid
When it comes to car camping, I can endure the occasional blazing inferno if absolutely necessary, but there must be a better way. For a while, I used some magnetic window screens custom made for my vehicle, made by a family in the St. Louis area…
The screens are an innovative and effective solution, and I have used them successfully and often. However, several years ago, on a car camping adventure near the Smoky Mountains in mid-August, I tried to sleep one evening, but the temp was 90, and this was at nine o’clock at night. At that point, all I had was a fan, but fans don’t touch the misery of a guy from Wisconsin trying to sleep at 90 degrees with intense humidity. Screens don’t fix 90.

So, on that miserably hot and humid trip, I started looking into options for cooling a car. Sure, I could just leave the car running all night, but I didn’t want to use the fuel, and I certainly didn’t want the wear and tear issues of leaving a car idling for 8-10 hours. Plus, I wasn’t wild about the possibility of being overcome with carbon monoxide and waking up dead.

So I started researching portable air conditioners. For a brief moment, I considered the idea of freezing water in a 5-gallon bucket with a fan on top, but how do I re-freeze a bucket of water while camping? This might help a little bit for one night, but I’m gone for more than a week at a time. Plus, this wouldn’t touch the humidity issues; in fact, it would probably make it worse (a fan blowing warm air over a block of ice all night).

I considered a commercially available portable A/C unit, the kind they make for doghouses and for cooling small places like computer closets. I thought about mounting the main unit on a roof rack or roof basket and running the vent hoses down through a specially designed window fitting in a partially closed window. Most of these units, though, are more than $500, and I’m trying to save money, not spend more money.


A slightly cheaper option is a portable room air conditioner, often available at places like Home Depot. I could put one of these in the passenger seat and vent the warm exhaust out a window. But these things are huge. Plus, as I started reading, I realized that many of them either need a drain or have a bucket that needs to be constantly emptied (like a dehumidifier). There must be a better way.


At some point, I took our car in for service, and our mechanic had posted a clipping of a beat-up old car with a generator strapped on the trunk and a window A/C unit sticking out one of the windows. That’s it! But since my car is already wired for “shore power” (see my previous post on this), I definitely don’t need the generator. So, I went home and did some more research. I’ll admit that some of my motivation came from some sites like this one:

Crazy A/C 
I took some measurements, did some more research online, went on Amazon and ordered the smallest window unit I could find, the Frigidaire FFRA0511R1 5,000 BTU 115V Window-Mounted Mini-Compact Air Conditioner with Mechanical Controls, 15 x 16 x 12 inches:

Amazon: Frigidaire Window Unit A/C
Once the unit arrived, I set out to find a way to mount it in the window in a way that would be safe and fairly weather-tight, and in a way that would be cheap (using materials from our local Habitat Restore). The unit would also need to tip ever so slightly outward, to keep the condensation from running back into the car. After some trial and error, I cut a piece of plywood the exact size of the bottom of the unit, carefully measured, and then screwed two pieces of old wooden handrail on the bottom of the plywood (nearly, but not quite parallel to each other, due to the fact that my “window ledge” is slightly wider at the back than at the front). After finishing the ledge in weatherproof exterior paint, I then carefully screwed the plywood contraption to the bottom of the A/C unit, being very careful to not puncture anything critical. Since the outer handrail would be resting on the exterior finish of the car, I covered it with a piece of pipe insulation. Once everything was together, the unit fit perfectly on the ledge and was perfectly balanced.


I then made a cardboard template of the hole that was left around the outside of the A/C unit. This is the gap that would need to be filled to seal out hot air and rain. I considered some kind of wooden trim, but the side of the car curves inward toward the top, so it needed to be flexible. I toyed with the idea of foam sheeting (from a craft store) or some kind of sheet of rubber (like in an inner tube), but these would be a little too flimsy. While roaming our local Menard’s store, I walked by the floor runners that are available by the foot. This might work! I ultimately decided on a rubber floor runner, since it is rather substantial and thicker than a sheet of rubber. I got about three feet, took it home, and cut it according to the template. I then used some industrial-strength rubber adhesive to glue a series of crazy-strong magnets on what would be the outside of the rubber trim, but I only installed the magnets (obviously) where they would make contact (through the rubber mat) with the steel of the car.


The contraption was coming together, but I still needed a way to make the gap a little more secure. So, I went back to our local Habitat Restore and got some kind of steel channel about ¾” deep. I cut two of these to the appropriate length and mounted them with screws (at the appropriate angle, matching the angle of the car exterior) to both sides of the A/C unit. This would be somewhat weatherproof and would give a good barrier between the hot side and the cold side of the A/C unit.


Finally, success! On the day I worked on this project, the temp was around 90, so it was the perfect opportunity to run a test. With the A/C unit perched on the window ledge, I deployed the rubber trim, plugged in the unit, and turned it on. Within minutes, the temp in the car started plummeting, and within half an hour, the temp in the car was down in the mid 60’s. Yes!!!


When I called my wife outside to show her the contraption, she rolled her eyes and said she would be getting me some of those stick-on jewels to go on the outside of it. “Why?” I asked. “Glamping,” she said. I had finally crossed the line from camping to glamping (a combination of "glamorous" and "camping," I'm afraid).

Before wrapping it up, I got a little concerned about the unit falling out of the car. My concern was rolling over in the middle of the night, giving it a good elbow-jab, and having it scratch the whole side of the car on it’s way down to disastrous contact with the earth. So, I got a length of strap and a buckle, installed an old drawer pull under the outer lip of the base, and whenever I deploy this thing, I simply run the strap around the roof rail. This lets some of the weight rest on the outward side, pretty much preventing it from falling inward, while assuring it won’t fall outward. I also became slightly concerned about how watertight this would be in a driving rain. So, I basically built an awning that hooks over the roof rail and deploys right to the edge of the unit.


I have now used this contraption on two ten-day trips to Tennessee in August, and it has been awesome. I store it just inside the back driver’s side of the Outback, right next to the end of the bed platform. The rubber mat stores quite nicely on the upside down awning, and this travels on the end of the bed platform. When I set up camp for the night, I plug in, deploy the A/C, and within 20 minutes or so, the interior is rather chilly. Before dozing off, I usually turn it on low, and it has been great.


On my way down to Tennessee last week, I camped at Turkey Run State Park in west-central Indiana, and some fellow campers stopped by a took some pictures of the setup. I’m not sure whether they were impressed with the idea or perplexed by the crazy old guy from Wisconsin. Either way, I had a cool night of peaceful sleep.